Tips for taking great photos of fireworks

Everyone loves fireworks, with the 4th of July just around the corner we thought that we would put together a list of tips for taking great photos of fireworks.

Photo by SJ photography

Location: You should try to get to your location early, so you can avoid the crowds and find the perfect spot. When selecting a location consider a vantage point that is behind and above the crowd or where you can photograph a local landmark as well as the fireworks.

Photo by amrufm

Equipment: In addition to your camera, a wide angle lens and freshly charged batteries, you should consider bringing a good tripod and a remote shutter. Consider bringing some black fabric (a shirt maybe), we will talk about this later.

Aperture: The fireworks are quite bright, so unlike most low light photograph, you are going to want to us a low aperture of between f/8 and f/16.

ISO: Set your ISO to 200.

Shutter Speed: Set your camera to bulb setting and use the remote shutter. This way you can hit the shutter just as the fireworks are launched to get the light trail and release it after the explosion has occurred. For a more dramatic image, take that black fabric and place it over the front of the lens. Hit the shutter and remove the fabric as the fireworks explode, then replace it between explosions. This will give you a interesting look with multiple fireworks in one image, but do not go overboard or you might overexpose the image.

Focus: Turn off auto-focus and set your camera to infinity. If you don’t have infinity on your camera than just manually focus on the first few burst.

Things to keep in mind:

  • Through out the fireworks show make sure you check your results, after all the 4th of July only comes once a year
  • Try taking photos of people watching the fireworks, or from a different perspective.
  • Try to take your photos up wind of the fireworks, so that the smoke doesn’t take away from your photos.
  • The first set of fireworks will have less smoke, so be ready for the first volley of fireworks.
  • Make sure you flash is off.
  • Consider using a zoom lens, once you have a general idea of where the fireworks will be going off. You can zoom in and change the way your photo is framed to give you a different look.
  • Just get out there and have fun with your family and your camera.

Photo by focusshoot

Here are some more tips from Pixiq has some more tips to make your photos stand out:

  • Using a reference point like a building or other structure will add to the magnitude of the fireworks display and add interest in the image.
  • Try to capture as many different frames as possible. It’s really hard to tell which ones are going to look best while your shooting.
  • Take a few images of the people watching the fireworks as well. The light from the fireworks themselves will create interesting light casts on the observers.
  • If you’re near water use the reflection of the fireworks in the image to create some truly magical pictures.

Taking photos of the stars

I love the stars, there is nothing better than laying down on a grass field, far away from the city lights and just looking up at the night sky. If you are like me than you will want to try to capture the beauty of the

Photo by Dan Newton
stars on your camera. Ben Canales is an amazing night time photographer, he has put together a basic video guide to takeing some amazing night time photos.

Some things to keep in mind when taking photos of the stars:

  • Have a plan and know where you are going.
  • Prepare: check the weather, bring a flashlight, know your camera, check your camera, bring and use a tripod and preset your camera.
  • Turn off auto-focus.
  • Use your cameras timer to reduce camera movement.
  • Take photos in RAW (if available).
  • Crank up your ISO (2000-4000).
  • Open up the aperture.
  • The rule of 600 or 400 helps you determine the max exposure you can set your camera to, before you will see star trails.
    • For full frame cameras take 600 and divide it by the focal length of your lens.
    • For crop body cameras take 400 and divide it by the focal length of your lens.
    • If you have a 20mm lens, take 600/20 = 30 seconds so you can set your camera to 30 seconds, or 400/20 = 20 seconds.
  • Watch out for clouds.
  • Point your camera away from cities otherwise light pollution may show up in your photos.
  • Take lots of photos.
  • Take some time to enjoy the sky and have fun.

Photo by Dan Newton

If you liked this then make sure you check out our Low Light Photography Tips- Infographic and our three part series on low light photography: Low Light Photography TipsLow Light Cameras and Equipment, and Fixing Underexposed Photos.

low light photography
Snapsort’s Low Light Photography Infographic

Lytro cameras lets you focus after you have taken the photo

Lytro, a new camera start up, is trying to make the biggest change in the photography world since the 1800s. Instead of taking a traditional photo that just captures one plane of light their camera captures the entire light field in one shot, this allows you to adjust the focus after a photo is taken. The camera is built on research from the mid-1990s called light field technology, where 100 cameras were required in the same room to produce the same type of photo, Lytro is able to recreate that effect and fit it into your pocket.

The Lytro camera uses a microlens array sensor which captures more light data, from many different angles. Then that data if sent through powerful software that allows you to switch the focus point. In addition the camera is much faster than traditional cameras, there is no shutter lag or autofocusing device, this allows you to take photos faster.
(click the image to set your focus point)

The camera also gives you the feeling of 3D, by reorienting a photo after it is taken. You are also able to take photos in much lower light than regular cameras. When you take a traditional photo you have one opportunity to set the depth of field, while light field camera takes a lot of photos from different locations and angle which allows it to produce this type of image.

The company has raised $50 million to bring their new light field camera to the market. There is a big risk that this might be too much innovation and that consumers will not buy the camera if the price is too high. There is no word on how much the camera will sell for, but they say it will be priced for the “Consumer market” and should be out by the end of the year.

What do you think, is this just a neat feature, or the next innovation in cameras?


(Via NYT and TechCrunch)

Low Light Photography Tips – Infographic

We’ve just finished our four part series on low light photography.  Low light photography is something that we all must deal with as photographers.  Whether you’re taking photos with a point and shoot during an evening out, shooting a wedding party or capturing a landscape at dusk it’s important to understand the basics of shooting with low light.  Photography is all about light, low light photography is no different and it offers new challenges and opportunities for creativity.

The first three parts in our series are:

Our fourth part is our low light infographic which we’re providing as a quick reference.  We thought beginners may want to print it out and keep it on them as they learn about low light shooting.  We have a few versions of it below so if you do print it click on for the biggest version.

Feel free to insert the full infographic on your blog for your readers benefit, just credit us back as the source using the code below.  Enjoy!

Embed the Mini Infographic (600 x 550)

<a href="http://snapsort.wpenginepowered.com/files/2011/04/Shooting-in-low-light-1000px.jpg"><img width="600" height="550" src="http://snapsort.wpenginepowered.com/files/2011/04/Shooting-in-low-light-mini.jpg" title="Low Light Photography Infographic" alt="low light photography"/></a><br /> <a href="http://snapsort.com">Snapsort's</a> <a href="http://blog.snapsort.com/2011/04/05/low-light-photograph/">Low Light Photography</a> Infographic

Embed the Mini Infographic (600 x 1900)
<a href="http://snapsort.wpenginepowered.com/files/2011/04/Shooting-in-low-light-1000px.jpg"><img width="600" height="1900" src="http://snapsort.wpenginepowered.com/files/2011/04/Shooting-in-low-light-600px.jpg" title="Low Light Photography Infographic" alt="low light photography"/></a><br /> <a href="http://snapsort.com">Snapsort's</a> <a href="http://blog.snapsort.com/2011/04/05/low-light-photograph/">Low Light Photography</a> Infographic

Embed the Mini Infographic (800 x 2533)
<a href="http://snapsort.wpenginepowered.com/files/2011/04/Shooting-in-low-light-1000px.jpg"><img width="800" height="2533" src="http://snapsort.wpenginepowered.com/files/2011/04/Shooting-in-low-light-800px.jpg" title="Low Light Photography Infographic" alt="low light photography"/></a><br /> <a href="http://snapsort.com">Snapsort's</a> <a href="http://blog.snapsort.com/2011/04/05/low-light-photograph/">Low Light Photography</a> Infographic

Fixing Underexposed Photos in Camera Raw

Taking photos in low light takes some practise to perfect, we have put together a great guide to help you master the art of low light photograph. Tips for taking low lights shotslow light cameras and equipment, and even a infographic on low light photography tips to bring it all together. We hope you enjoy.

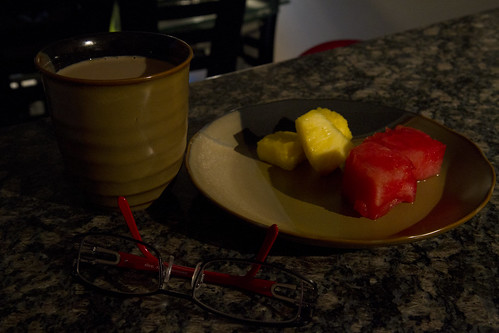
Underexposed photographs can be salvaged using post-processing software. If you’re shooting in RAW format, even more post-processing capabilities are available to you. Sometimes it’s beneficial to purposefully underexpose a shot, especially if you’re shooting hand-held in dim lighting situations. It’s better to get a shot that’s a bit underexposed but salvageable, rather than a properly exposed but blurry photograph.

For the purposes of this discussion, I will be editing a photo using Adobe Bridge, Camera Raw 6.3 and Photoshop CS5. However, many of the features and basic steps are applicable in other programs.

First, here is the (purposefully) underexposed shot, a still life of my morning:

This photo was shot in RAW format, so when it is opened from Adobe Bridge, it brings up the Camera Raw (6.3) panel:

Click for larger image

The first thing I usually do is click on “Auto” to see what settings Camera Raw would recommend for this photograph:

Click for larger image

As you can see, the “Auto” settings may not be appropriate for this shot. The increased exposure and brightness blew out portions of the image. To undo the automated settings, simply click on “Default” to bring the settings back to where they originally were. Now play with the various sliders, primarily “Exposure”, “Recovery”, “Fill Light”, “Blacks”, “Brightness”, and “Contrast” to achieve the desired appearance. As each slider is moved, a preview of the changes can be seen.

Click for larger image

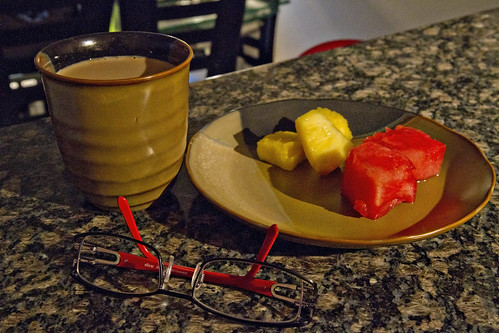
Once the desired appearance is achieved, click on “Open Image” to open the image in Photoshop. If no more adjustments are needed, save the file as a JPEG. In this case, some noise reduction and sharpening was in order. Here is the final image:

Quite a difference from the original, and the adjustments only took me approximately two minutes!

In a future article we will discuss fixing JPEG photos using adjustment layers in Photoshop.

Photo credits: Tiffany Joyce