Pixels, Bytes, and DPI – Oh My!

When it comes to sensors, size matters, but maybe not as much as people think - by Infomatique via Flickr

Understanding the difference between megapixels, megabytes and DPI is one of those subjects that makes people glaze over sometimes because it’s technical. But, if you’re angling to make money from photography or do it for a living, it’s important to understand what the terms mean and the difference it makes in your photos. So, while I realize a pictorial of hot models in skimpy clothing is how you’d rather be spending your time, I’m going to try to make this discussion as fun and interesting as humanly possible.

Megapixels

Probably the most ridiculously overused comparison in digital cameras today, and the camera manufacturers go along with it because it’s not worth the effort trying to explain why it’s not always a fair comparison. Comparing cameras by their megapixel rating is like my wife picking a new car because she likes the color. The number of megapixels has very little to do with the quality of the final image. Color, tone and sharpness will have far more sway over the quality of the final image, which is one of the reasons the highest rated cameras are all over the road when it comes to the megapixel rating of the sensor.

The difference in megapixels does effect the resolution of the final image, but even that is a geometric comparison and not a linear scale. The number of pixels increases by the square of the resolution. If you double the resolution of an image, you quadruple the number of pixels.

If you’re comparing a 5 megapixel camera, like your cell phone, with the 10 megapixel Sony TX300v, you now know that does not mean the 10 megapixel camera is twice as good. In fact, the difference in resolution is just 1.4 x in either dimension. Not so great now, is it?

sensor size chart
You have to nearly double the sensor size to see any significant increase in resolution - via Wikipedia

So when considering the difference between a 16 megapixel camera and a 19 megapixel camera, the difference is nearly insignificant. Other factors in camera and lens quality can erase such a small difference.

Where megapixels do matter is the image size, the more megapixels, the bigger the final image. That says nothing about the quality. A large blurry image through a bad lens is still a bad picture no matter how large it is.

If you’re just looking at your own pictures on a display device, it’s not an issue. If you’re hoping to sell stock photography, it becomes more important because many stock photo companies set minimum image sizes.

True resolution

Snapsort uses true resolution which is based on the physical size of a cameras sensor and not the manufactures advertised high megapixels, which can be misleading.

Megabytes

A megabyte is a measure of digital storage, the same as it’s applied to any digital storage. How large an image is is loosely related to the final image size, but every image file is a little different based on a large number of factors including the compression type (JPEG vs RAW).

NASA photo
In 1999 NASA had to take a composite image to get this 2,796 x 2,796 pixel image of Io. Roughly 8-megapixels, or about the same resolution as an iPhone 4s today - by NASA

DPI

Dots per inch is only relevant to a discussion of a printer or other display device. Outside of printers, you can pretty much forget about DPI. In the old days if you changed the picture DPI, your editing software would automatically resize the print output. These days if you tell Photoshop you want a 5×7 and change the DPI, you’ll still get a 5×7 print.

In photography it’s all about the resolution and resolution is measured in megapixels, but that isn’t necessarily significant unless the difference is very large.  There would be a noticeable difference between an 8-megapixel camera and a 12-megapixel camera, the difference between 12 and 16-megapixels would not be as significant, if it were even noticeable.

Has The Retouching Arms Race Gone Too Far?

retouching example
In this photo I reduced the wrinkles around the eyes, whitened the teeth and smoothed out her skin - Too much?

Has the retouching arms race gone too far? That’s a question a group of scientists are asking and they’ve developed a new metric for rating photos on a scale of 1 to 5, depending on how much retouching the photograph has received.

It’s not enough anymore to have fantastic cameras, a portrait lens that could inspire glass lust, and a high end lighting setup. Today we need even more.

Photoshop plugins like Portraiture and stand alone products like Portrait Professional now make what were once time-consuming alterations to portraits little more than point and click.

Health organizations are increasingly concerned that the photography profession is pushing an unrealistic standard. We could argue at length whether the main driver is the photographer’s drive for perfection or client demands, but I think we have to own up to at least a contributory role.

It all started innocently enough, just using the clone tool to mask the zit here, the small blemish there, and maybe fill in that chipped tooth just a tad. Later that grew into smoothing out the skin tones. Plugins popped up to make it all as easy a few clicks of the mouse. It wasn’t long before we were making the eyes bigger, making the eye color brighter, slimming the jaw line, making the neck longer. We could take inches off a waist or pounds off of hips and customers loved us for it. It was all very gradual and we were praised by clients and peers every step of the way.

Now the question is have we become guilty of creating a Frankenstein’s monster of perfection unattainable by mere mortals?

If you’ve ever worked with real, paid, high-end models, you already know there isn’t a lot of Photoshop required. You’re dealing with the top 1 to 2 percent of people in the entire population; you’re playing in the shallow end of the gene pool. They make their living looking good and with a good makeup artist they are the real deal.

But with software to the rescue we can gain near perfect regardless of the physical form we start with. We don’t need a top model anymore, we can pull any waif off the street, bad skin, bad teeth, bad hair, no makeup and make them look like a supermodel.

So now Professor Hany Farid and Eric Kee, computer scientists at Dartmouth College in New Hampshire, are set to rat us out. About to publish a set of tools that analyze how much retouching has gone into a photo. Soon the world will know if her eyes are really that color of if they were punched up post. If her skin really that smooth or if it’s an adjustment layer.

So, what do you think? Do we deserve to be outed? Has the retouching arms race gone too far without a discussion about whether we’re setting unrealistic standards?

I’ve seen portraits worked so much in post they look fake, like a mannequin.  Somewhere in between there has to be a happy medium.

Adobe Launches V10 of Photoshop & Premiere Elements

Adobe Systems announced the release of version 10 of Photoshop Elements and Premiere Elements, two of their popular photo and video editing applications.

Photoshop Elements fielded a crop of upgrades, including support for 64 bit systems running Window 7. Other add-ons include the ability to paint specific effects and patterns on parts of photos and post-processing simulated bokeh and other guided edits.

Also new is the ability to search for photos that contain specific objects, so if you’re looking for all pictures that feature a motorcycle, you can have Object Search do the legwork for you. Search functions also include the ability to weed out duplicates.

Simplified text to path and text to shape tools will make it easier for users to create their own cards and event notices, along with several built-in templates for online and printed albums.

Another feature you may or may not appreciate is integration with Facebook’s facial recognition tagging. There are also other updates for better integration with other social media sites.

For the more technically savvy, Adobe has integrated the Photoshop Touch API, which lets developers build touch tablet apps that interact with Photoshop and now will also work in Elements.

Other new features include what Adobe calls “content intelligent tools” that will do things like move people from one background to a different one, choose the best looks for each individual in a group shot and even wipe people out of a scene.

Photoshop and Premiere Elements are available for download for $99.99 each or $149.99 together. Available for Mac and Windows.

For More Info:

Adobe

Fixing Underexposed Photos in Camera Raw

Taking photos in low light takes some practise to perfect, we have put together a great guide to help you master the art of low light photograph. Tips for taking low lights shotslow light cameras and equipment, and even a infographic on low light photography tips to bring it all together. We hope you enjoy.

Underexposed photographs can be salvaged using post-processing software. If you’re shooting in RAW format, even more post-processing capabilities are available to you. Sometimes it’s beneficial to purposefully underexpose a shot, especially if you’re shooting hand-held in dim lighting situations. It’s better to get a shot that’s a bit underexposed but salvageable, rather than a properly exposed but blurry photograph.

For the purposes of this discussion, I will be editing a photo using Adobe Bridge, Camera Raw 6.3 and Photoshop CS5. However, many of the features and basic steps are applicable in other programs.

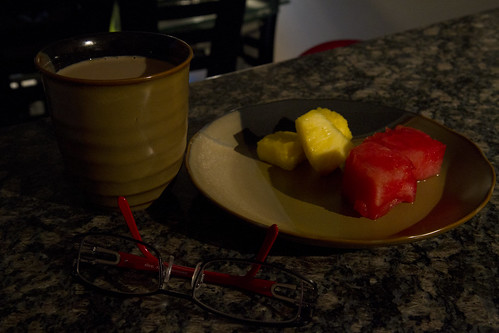
First, here is the (purposefully) underexposed shot, a still life of my morning:

This photo was shot in RAW format, so when it is opened from Adobe Bridge, it brings up the Camera Raw (6.3) panel:

Click for larger image

The first thing I usually do is click on “Auto” to see what settings Camera Raw would recommend for this photograph:

Click for larger image

As you can see, the “Auto” settings may not be appropriate for this shot. The increased exposure and brightness blew out portions of the image. To undo the automated settings, simply click on “Default” to bring the settings back to where they originally were. Now play with the various sliders, primarily “Exposure”, “Recovery”, “Fill Light”, “Blacks”, “Brightness”, and “Contrast” to achieve the desired appearance. As each slider is moved, a preview of the changes can be seen.

Click for larger image

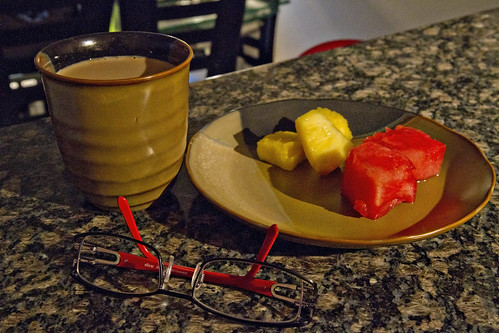
Once the desired appearance is achieved, click on “Open Image” to open the image in Photoshop. If no more adjustments are needed, save the file as a JPEG. In this case, some noise reduction and sharpening was in order. Here is the final image:

Quite a difference from the original, and the adjustments only took me approximately two minutes!

In a future article we will discuss fixing JPEG photos using adjustment layers in Photoshop.

Photo credits: Tiffany Joyce