Five Things Your Studio Needs You Won’t Find In a Photography Store

Over the years I picked up a few hacks for shooting in a studio you can’t find in a photography store. These are things that are especially handy to have if you’re going to be shooting all day.

Knee Pads

My last studio had a concrete floor and I actually discovered how nice these were as a volunteer firefighter. We would train by crawling around in the station after filling it with theatrical fog. Only took one training session before I started wearing knee pads under my turnouts.

The next day I tried them on a portrait shoot and loved them. I didn’t realize how much time I spent on one knee or the other as a photographer until I got these. Because they’re under you, you don’t have to worry about a green cast on anything you’re working on.

Power Squid

Photography doesn’t draw as much power these days, but everything has a power connector. Not all the connectors will fit right on a regular power strip and you’ll lose outlets to odd size plugs. Not with a power squid, these are made to accommodate odd size connectors.

Some have heavy duty fuses.

Aircraft Cable

I got this tip from a guy who used to design the stage sets for the rock band KISS.

Aircraft cable has boxes and boxes of different types of ends and connectors, available at any big box hardware store. Perfect for hanging backgrounds, especially when you’re working with a higher vertical than a background holder can handle. Some aircraft cable and a box of clamps and you can cover or hang almost anything.

Bungie Cords

Indispensable in a photography studio. You can bungie light stands so they don’t get knocked over, or wrap a couple around the base and anchor them to 1 gallon jug of water for light stand or tripod ballast. I also use bungie cords to bundle light stand bags for easier transport.


Gaffer Tape

Okay, you might find this indispensable tape in photography stores. Invaluable because it holds tight, but doesn’t tear or leave glue residue when it’s time to peel it off. Great for so many uses it’s almost impossible to list them. I used to have a big bungie cord loop of gaffer tape on my step ladder.

On movie sets it’s not unusual to see people with loops of gaffer tape on their belt. I even saw an AD using gaffer tape to hem a pair of slacks one time.

Lighting a White Background

photography studio
The advantage to this background is it will never tear - By Missvain

For portraits, it’s not unusual for photographers to employ a white background. After getting their Canon 5D MK II, it’s inevitably one of the first one or two backgrounds most photographers purchase.

You might think it’s easy to light a white background, or wonder if you need to light it at all. You will need to light it and it may be harder than you imagine. Once your subject gets four to six feet from the background, the light from the key falls off in a hurry. At six feet there can be a whole stop difference between your subject and the background. At a stop under the background is not going to be white, it’s going to be a flat gray “vampire background” that sucks the life right out of your portrait.

Situations like these are why incident light meters and flash slaves were made. You’ll want a softbox or umbrella on each side, positioned four to five feet off each side of your background, usually off camera behind the subject. Use a flag or white panel to keep the background flash from highlighting and outlining your subject. That will not be a pleasing look.

Adjust your flash power until the background is a stop lighter than your subject. That will give you that nice pure white glow without blowing back on your subject. In the video Gavin Hoey suggests two stops, but in my experience one is enough unless you have a lot of flaws and wrinkles in the background you’re trying to hide.

Take your light meter and check the back of the subject, just to make sure you’re not getting highlight from the background. The meter check behind the subject should not be any higher than in front. If it is, move the lights or your subject farther away.

Bokeh Demystified

bokeh explained
A good example of bokeh - by Angel mat-eye

Bokeh is the Japanese word for “blur” and can lead to some common misconceptions about the effect. I’ve heard bokeh explained as, “Just a blurry background.” It’s tough to bite back the annoyance that arises at such a simplification. A Rembrandt is not just a pretty painting and bokeh is more than blur.

More specifically, bokeh is a highly stylized background created by selectively blurring parts of the picture in a way that highlights the subject. Not merely a blurred background, but one that pops with colors and patterns.  Good bokeh doesn’t always require a subject, sometimes just the pattern of lights without a subject is just as appealing.

You don’t need special equipment to achieve bokeh, but it helps to have a fast lens, like the Nikkor 50mm f/1.4 and a selection of ND (Neutral Density) filters. Those help achieve the lower f-stops you’ll need and they’re also handy for shooting video where you have less latitude in shutter speed selection. You don’t have to use ND filters, you can also experiment with your camera’s Aperture Priority mode (the “A” setting on Nikon, “Av” on Canon) and let the camera set the exposure, but I like the results with ND filters a little better and I can still lock a subject in motion.

For the inspirational bokeh, look for sunlight filtered through leaves and foliage or bright pinpoints of light in the background.

Get as much separation as you can between your subject and the background.

As far as I know there are few cameras with an “auto bokeh” setting, so you’ll want to use the widest aperture (lowest f-stop) your lens can achieve.

If you need fill flash, you’ll be limited to flash sync shutter speeds, which may or may not yield the desired f-stop. Times like these is when you may want your neutral density filters.

You can also cheat and get a similar effect in post-processing with Photoshop or GIMP, but I like getting the best possible results in the cameras and save the time in post.

Tips for Photographing Skin Tones

My idea of quality skin tones
Skin tones can one of the hardest exposure challenges in photography - by dbking

As long as photographers have been taking pictures, they have been chasing the perfect skin tones.  What I’ve discovered over the years is that we’re actually chasing a look that’s better than real life.The look of human skin is not necessarily improved with more detail and the “perfect” exposure is not always the most technically accurate one.

The other problem with human skin is the tone can be wildly variable, depending on genetics, lifestyle factors, age, makeup, and the natural amount of oils in the skin.  Skin tones are, literally, like snowflakes; every one is different and each presents unique challenges.

I’m not above working in post until the subject’s skin looks pure as an Antarctic snowdrift, but I’m going for the absolutely best look I can get out of my Canon 7D to cut down the amount of post processing I have to do later.

Background

Background is key for getting quality skin tones.  If there is too much contrast between the subject’s skin tone and the background you’re going to spending a lot of time in post masking off the subjects face and trying to correct under-exposed skin tones.

You want some color contrast, but not in terms of luminosity.

Lighting

Whether indoors or out, I’m looking for the most diffuse and even lighting I can find.  The single hydrogen ion key light, located 93 million miles from the subject, filtered through 100 miles of Mark I water vapor filter can be difficult by itself.  I’m looking for reflected sunlight or indirect light in a shaded area.

Most often I’ll still use a diffused fill flash and a reflector at a 45 degree angle.

If I’m shooting indoors, I’m using soft boxes and a snoot for highlights.

Exposure

Sure, I’ll meter the whole scene, then spot meter my subject and background.  I’ll even pull my incident light meter out of the bag.

In the end, however, and I’m not too proud to admit this, I cheat.  When I’m shooting a portrait, I bracket the daylights out of the shots.

It’s not pretty, but it works.

Travel Photography

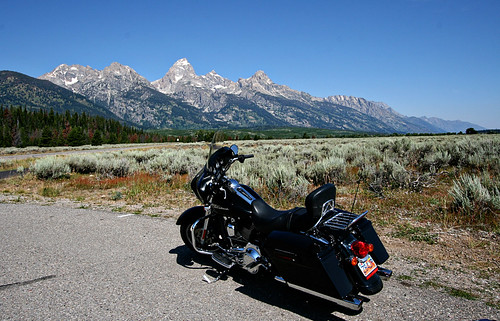
Our rented Harley Street Glide in front of the Grand Tetons.

One of the primary reasons that people practice photography is to record their travel experiences. Once-in-a-lifetime opportunities can be memorialized forever, which actually generates a form of anxiety within the photographer. “I’ll only be here for a brief time, how can I guarantee that my photos turn out well? What if my camera gets stolen, or what if my memory card gets lost or accidentally erased? What gear should I take with me to cover the range of circumstances that I might encounter?” This article is going to help you answer some of those questions and relieve some of that anxiety.

There are some tricks you can use that won’t necessarily guarantee that you’ll get “the” shot, but will certainly improve your odds. First, don’t be afraid to use your camera’s automated settings – primarily “P” or “Program Mode”. This comes in especially handy if you are moving through various light levels and shooting various subject matter, moving from indoors to outdoors and back in again, if you’re in a vehicle, or if you simply don’t have the opportunity to slow down and determine the aperture and shutter speed that each shot would require. Just use a higher ISO, such as 800, which will accommodate any light level you might encounter. It won’t be a perfect ISO for every circumstance, but it won’t be too terribly high for outdoor shots, and will come in handy for dimmer lighting situations. Also, shoot in burst or continuous shooting mode. This will increase the likelihood that the shot you want is focussed and framed appropriately. Finally, shoot in RAW format so that you can improve sharpness, composition, white balance and exposure in post-processing should it be necessary. Recommended Cameras: Canon EOS 7D, Pentax K-5, Nikon D300S, Sony Alpha A580.

Next is to consider a lens that has all of the focal range and flexibility you may need for a multitude of situations, is light enough to carry around all day, and is fast enough to accommodate low light levels. Such a lens is tough to find, but you certainly don’t want to be lugging multiple lenses around, especially if you’re on foot! Choose a lens with image stabilization so that you are more successful getting hand-held shots (who wants to lug around a tripod or monopod all day?). Consider these recommended lenses: Sigma 18-250m f/3.5-6.3 (available for both Canon and Nikon), Canon EF 70-300mm DO IS USM (or the Nikon equivalent), Canon EF-S 17-55mm f/2.8 IS (or the Nikon equivalent).

In the spirit of keeping the weight down, consider leaving the battery grip at home and just carry a couple of spare batteries charged up and ready to go. Don’t skimp on the memory cards – put two or three 16 or 32 GB memory cards in your pocket. Some folks I know even leave off the lens hood and UV filter, trying to get the camera as light and manageable as possible. Don’t bother with an external flash unless you know you’re really going to need one. Really, the less obtrusive your camera appears, the less likely it is to draw the wrong kind of attention (like would-be thieves). Consider even getting a generic camera strap instead of the one that came with the camera, emblazoned with the brand and model.

Finally, consider traveling with your laptop and an external hard drive. Yes, this adds bulk to your traveling gear, but it also adds peace of mind. If you have the ability to off-load photos from the memory cards onto the computer hard drive or external drive, you can feel much more comfortable about the safety of the photos. It also helps to upload to photo sharing sites such as Flickr throughout your travels – dedicate an hour or so each night while hanging out in your hotel room to uploading your photos to a site, which will further protect them from loss.

Hopefully some of these tips will help you during your next trip. Happy travels!

Photo Credit: Tiffany Joyce